

Redis #.8 Docker를 이용한 Redis cluster 구축 (ver. 5.0.5-buster)

Docker를 이용한 Redis cluster 구축 (ver. 5.0.5-buster)
패키지를 이용한 구축 방법은 별로 어렵지 않아서, 그냥 각 노드에 패키지 깔고, 파라미터 수정해서 redis-server를 port에 맞게 실행만 해주면 됩니다.

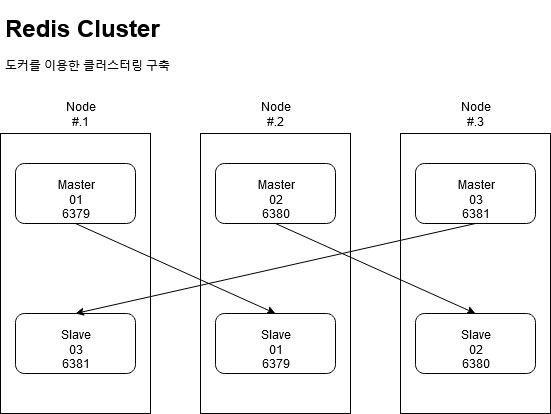
해당 구조로 6개의 Redis를 각각의 도커로 올려서 구성해 보겠습니다. 우선 Docker가 설치되어 있어야 합니다.
Docker 설치 (https://rastalion.me/archives/796)
각각의 노드에 Docker를 설치합니다.
Docker로 Redis 설치
Node #1
docker run -d --name redis-master01 --network host -v /redis/master01:/data redis:5.0.5-buster redis-server --port 6379 --cluster-enabled yes --cluster-config-file node.conf --cluster-node-timeout 5000 --bind 0.0.0.0
docker run -d --name redis-slave03 --network host -v /redis/slave03:/data redis:5.0.5-buster redis-server --port 6381 --cluster-enabled yes --cluster-config-file node.conf --cluster-node-timeout 5000 --bind 0.0.0.0 --appendonly yes
Node #2
docker run -d --name redis-master02 --network host -v /redis/master02:/data redis:5.0.5-buster redis-server --port 6380 --cluster-enabled yes --cluster-config-file node.conf --cluster-node-timeout 5000 --bind 0.0.0.0
docker run -d --name redis-slave01 --network host -v /redis/slave01:/data redis:5.0.5-buster redis-server --port 6379 --cluster-enabled yes --cluster-config-file node.conf --cluster-node-timeout 5000 --bind 0.0.0.0 --appendonly yes
Node #3
docker run -d --name redis-master03 --network host -v /redis/master03:/data redis:5.0.5-buster redis-server --port 6381 --cluster-enabled yes --cluster-config-file node.conf --cluster-node-timeout 5000 --bind 0.0.0.0
docker run -d --name redis-slave02 --network host -v /redis/slave02:/data redis:5.0.5-buster redis-server --port 6380 --cluster-enabled yes --cluster-config-file node.conf --cluster-node-timeout 5000 --bind 0.0.0.0 --appendonly yes
제가 bind를 0.0.0.0 으로 주는 이유는 오로지 귀찮아서 입니다. 일반적으로는 client ip를 주는게 맞습니다. 근데 어차피 앞단에 방화벽 다있을건데…
slave 쪽에 appendonly를 주는 이유는 마스터는 메모리 기반으로 빠르게 쓰고, 슬레이브 쪽에서 다소 느린 Disk 쓰기를 하여 데이터 보존을 하기 위함입니다.
Docker에서 redis-cli 명령으로 클러스터 생성
5버전부터는 센티널을 사용하지 않습니다. 다 내재화 되었습니다. –cluster create 명령은 auto sharding을 지원합니다. 명령을 실행하면 자동으로 샤딩 범위를 어떻게 할 것인지 묻습니다. 물론 범위는 자동으로 계산되서 나옵니다.
root@testdb01:~]# docker run -i --rm --network host redis:5.0.5-buster redis-cli --cluster create 192.168.160.25:6379 192.168.160.22:6380 192.168.160.29:6381 192.168.160.25:6381 192.168.160.22:6379 192.168.160.29:6380 --cluster-replicas 1
>>> Performing hash slots allocation on 6 nodes...
Master[0] -> Slots 0 - 5460
Master[1] -> Slots 5461 - 10922
Master[2] -> Slots 10923 - 16383
Adding replica 192.168.160.22:6379 to 192.168.160.25:6379
Adding replica 192.168.160.29:6380 to 192.168.160.22:6380
Adding replica 192.168.160.25:6381 to 192.168.160.29:6381
M: a3ca7212918ade94dc35e52befb57a74ce07c1b4 192.168.160.25:6379
   slots:[0-5460] (5461 slots) master
M: fc343bf45beb7b60e9bdae236fd33381fe9e1212 192.168.160.22:6380
   slots:[5461-10922] (5462 slots) master
M: c9d966fab2a30ca1e8973850ca8eb96ac6aa6aee 192.168.160.29:6381
   slots:[10923-16383] (5461 slots) master
S: a603ed354a75b70a23b569ce0d33d22b3e31787f 192.168.160.25:6381
   replicates c9d966fab2a30ca1e8973850ca8eb96ac6aa6aee
S: 7bbda69a1e51c138951f2b1213a1f9c050194c73 192.168.160.22:6379
   replicates a3ca7212918ade94dc35e52befb57a74ce07c1b4
S: 8c447ad2c7f95bbeee9492c6ed3579b056d6c173 192.168.160.29:6380
   replicates fc343bf45beb7b60e9bdae236fd33381fe9e1212
Can I set the above configuration? (type 'yes' to accept): yes
>>> Nodes configuration updated
>>> Assign a different config epoch to each node
>>> Sending CLUSTER MEET messages to join the cluster
Waiting for the cluster to join
..
>>> Performing Cluster Check (using node 192.168.160.25:6379)
M: a3ca7212918ade94dc35e52befb57a74ce07c1b4 192.168.160.25:6379
   slots:[0-5460] (5461 slots) master
   1 additional replica(s)
M: fc343bf45beb7b60e9bdae236fd33381fe9e1212 192.168.160.22:6380
   slots:[5461-10922] (5462 slots) master
   1 additional replica(s)
S: 8c447ad2c7f95bbeee9492c6ed3579b056d6c173 192.168.160.29:6380
   slots: (0 slots) slave
   replicates fc343bf45beb7b60e9bdae236fd33381fe9e1212
S: a603ed354a75b70a23b569ce0d33d22b3e31787f 192.168.160.25:6381
   slots: (0 slots) slave
   replicates c9d966fab2a30ca1e8973850ca8eb96ac6aa6aee
S: 7bbda69a1e51c138951f2b1213a1f9c050194c73 192.168.160.22:6379
   slots: (0 slots) slave
   replicates a3ca7212918ade94dc35e52befb57a74ce07c1b4
M: c9d966fab2a30ca1e8973850ca8eb96ac6aa6aee 192.168.160.29:6381
   slots:[10923-16383] (5461 slots) master
   1 additional replica(s)
[OK] All nodes agree about slots configuration.
>>> Check for open slots...
>>> Check slots coverage...
[OK] All 16384 slots covered.
–cluster-replicas <arg>는 하나의 마스터가 몇 개의 슬레이브를 가질것인지 표기를 해주는 곳입니다.
–cluser create 명령은 순서대로 앞의 3개는 마스터로, 뒤에 3개 노드는 순서대로 슬레이브가 됩니다.
Master[0] -> Slots 0 – 5460
Master[1] -> Slots 5461 – 10922
Master[2] -> Slots 10923 – 16383
해당 로그는 샤딩의 범위를 알아서 계산해주고 이렇게 할 것인지 묻는 질문이 나오고 yes로 대답하면 계속 진행이 됩니다.
Adding replica 192.168.160.22:6379 to 192.168.160.25:6379
Adding replica 192.168.160.29:6380 to 192.168.160.22:6380
Adding replica 192.168.160.25:6381 to 192.168.160.29:6381
로그를 보면 Node #1 Master(192.168.160.25:6379) 에 슬레이브로 Node #2 Slave(192.168.160.22:6379) 연결된 것을 확인 할 수 있습니다. 이런식으로 노드간 엇갈린 구조로 클러스터링이 구성 됩니다.
Cluster 정보 가져오기
root@testdb01:~]# docker run -i --rm --network host redis:5.0.5-buster redis-cli --cluster info localhost:6381
192.168.160.29:6381 (c9d966fa...) -> 0 keys | 5461 slots | 1 slaves.
192.168.160.25:6379 (a3ca7212...) -> 0 keys | 5461 slots | 1 slaves.
192.168.160.22:6380 (fc343bf4...) -> 0 keys | 5462 slots | 1 slaves.
Redis-cli –cluster create 명령어 살펴보기
아래 명령으로 조회 해보면 여러가지 옵션이 나옵니다. reshard 명령도 있고, 노드를 추가하거나 제거 할 수 도 있습니다.
root@testdb01:~]# docker run -i --rm --network host redis:5.0.5-buster redis-cli --cluster help
Cluster Manager Commands:
  create         host1:port1 ... hostN:portN
                 --cluster-replicas <arg>
  check          host:port
                 --cluster-search-multiple-owners
  info           host:port
  fix            host:port
                 --cluster-search-multiple-owners
  reshard        host:port
                 --cluster-from <arg>
                 --cluster-to <arg>
                 --cluster-slots <arg>
                 --cluster-yes
                 --cluster-timeout <arg>
                 --cluster-pipeline <arg>
                 --cluster-replace
  rebalance      host:port
                 --cluster-weight <node1=w1...nodeN=wN>
                 --cluster-use-empty-masters
                 --cluster-timeout <arg>
                 --cluster-simulate
                 --cluster-pipeline <arg>
                 --cluster-threshold <arg>
                 --cluster-replace
  add-node       new_host:new_port existing_host:existing_port
                 --cluster-slave
                 --cluster-master-id <arg>
  del-node       host:port node_id
  call           host:port command arg arg .. arg
  set-timeout    host:port milliseconds
  import         host:port
                 --cluster-from <arg>
                 --cluster-copy
                 --cluster-replace
  help

For check, fix, reshard, del-node, set-timeout you can specify the host and port of any working node in the cluster.
이렇게 아주 간단하게 도커로 클러스터 구축이 가능합니다.
이걸 docker-compose로 만들어서 ansible로 모든 노드에 자동으로 배포하는걸 목표로 다시 정리를 해봐야 겠습니다.
Redis 클러스터를 사용하는 이유
Failover 지원
5버전 이하의 Redis에서는 Sentinel을 사용하여 별도의 감시 역할을 부여 했습니다. 5버전 부터는 Cluster 자체적으로 모든 노드를 감시하고, 장애시 자동으로 Failover를 실행합니다. Redis Cluster를 사용하기 위해서는 각 노드에 설치된 Redis 만큼의 Port가 필요합니다. 만약 하나의 Host에 두대의 Redis 가 Master와 slave로 올라와 있다면, 2개, Master-slave-slave 3개다 올라와 있다면 3개의 포트가 열려 있어야 합니다. 그리고 노드를 감시하는데 사용하는 Redis Cluster Bus의 Port도 필요합니다
(6379에 10000을 더해 16379, default+10000). Redis는 Cluster Bus를 이용하여 각각의 노드를 감시하며, 장애 발생시 Failover를 실행합니다. Cluster Bus는 노드간에 데이터 교환을 위해 다른 바이너리 프로토콜을 사용합니다. 이 프로토콜은 대역폭과 처리 시간을 적게 사용하기 때문에 노드간의 정보를 교환하는데 적합합니다.
Auto Sharding
Redis Cluster Mode에서는 자동으로 Cluster Node에 대한 자동 샤딩을 제공합니다. Redis Cluster에는 16384개의 slot이 있으며, slot에 대한 구간 별로 샤딩이 가능합니다. slot을 계산하기 위해 redis key의 HashCode에 대해 CRC16의 16384 modules (key%16384) 연산을 실행합니다.
[0-5460] 까지는 1번 Redis Node에 저장
[5461-10922] 까지는 2번 Redis Node에 저장
[10923-16383] 까지는 3번 Redis Node에 저장
Redis Node가 scale out 되는 경우 Master Node 수를 나눈 만큼 대역이 할당
글 내용에 나온데로 해볼려 하였으나 cluster create부분에서 NOAUTH Authentication required 에러가 나오네요
혹시 비밀번호는 따로 지정을 하셨나요?
몇버전으로 하셨는지는 모르겠지만 5.0.5버전에서는 기본값은 패스워드를 묻지 않습니다.