

오픈스택 수동 설치 실습 #.4
오픈스택 수동 설치 실습 #.4 – Controller 노드에 PostgreSQL DB 설치
자! openstack.org 공식 문서에도 없는 부분이 왔습니다!
오픈스택의 공식 설치 문서에는 오픈소스 DB인 MariaDB를 사용해서 설치하는 법이 나와 있습니다. 그러나 오픈스택은 역시 오픈소스 DB인 PostgreSQL도 지원하고 있습니다. 그러나 설치는 사용자의 몫. 아쉽게도 공식 문서에는 PostgreSQL을 사용하여 설치하는 법 따위는 소개 하고 있지 않습니다.
이론적으로 OpenStack Compute는 SQL-Alchemy가 지원하는 모든 데이터베이스를 지원합니다. 일반적으로 테스트에는 SQLite3를 개발작업에는 MySQL, PostgreSQL을 사용합니다.
그러면 왜 저는 PostgreSQL을 설치 하느냐? 일단 제 업무 환경이 Postgres로 구성 되어 있습니다. 두번째, 성능면에서 MariaDB보다 뛰어납니다. 세번째, MariaDB보다 설정이 쉽습니다.
※ SQL DB는 controller 노드에만 설치를 합니다.
PostgreSQL Download 홈페이지
홈페이지에 가서 yum repo를 통해 원하는 버전의 패키지를 내려 받아야 합니다.
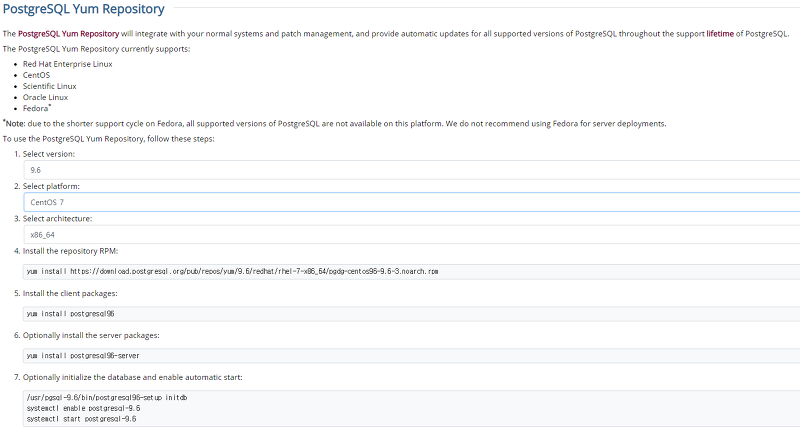
저는 9.6 버전을 선택했고, 플랫폼은 CentOS7을 설정했습니다.
설정을 하면 나오는 4번 항목의 주소를 복사해서 controller 노드에서 실행합니다.
# yum -y install https://download.postgresql.org/pub/repos/yum/9.6/redhat/rhel-7-x86_64/pgdg-centos96-9.6-3.noarch.rpm
그리고 postgresql을 yum으로 설치해야 하는데, 오픈스택에서 사용하는 driver인 python-psycopg2를 같이 설치해줘야 합니다.
※ python-psycopg2 패키지는 controller 노드 뿐만 아니라 모든 노드에 설치를 해줘야 controller 노드에 설치되어 있는 DB에 접근 할 수 있습니다.
# yum -y install postgresql96 postgresql96-server python-psycopg2
yum으로 설치가 완료되면 DB 클러스터를 구성합니다.
# /usr/pgsql-9.6/bin/postgresql96-setup initdb
그리고 DB가 서버 구동시 자동으로 올라오도록 구성해줍니다.
# systemctl enable postgresql-9.6
# systemctl start postgresql-9.6
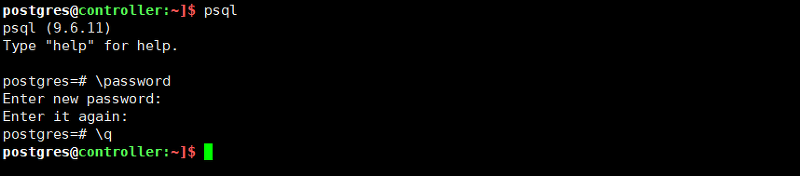
그럼 DB가 구동 되었는지 확인하기 위해 su – postgres 하여 유저 변환을 합니다.
root@controller:~]# su - postgres
-bash-4.2$
프롬프트 기본값이 영 보기가 좋지 않네요. .bash_profile을 수정합니다. (안해도 됩니다. 취향입니다…)
$ vi .bash_profile

# .bash_profile
# Get the aliases and functions
if [ -f ~/.bashrc ]; then
        . ~/.bashrc
fi
# User specific environment and startup programs

PATH=$PATH:$HOME/.local/bin:$HOME/bin
export PATH

[ -f /etc/profile ] && source /etc/profile
PGDATA=/var/lib/pgsql/9.6/data
export PGDATA
# If you want to customize your settings,
# Use the file below. This is not overridden
# by the RPMS.
[ -f /var/lib/pgsql/.pgsql_profile ] && source /var/lib/pgsql/.pgsql_profile
PATH=$PATH:$HOME/bin:/usr/pgsql-9.6/bin
export PS1="\[\e[27;1m\]\u@\[\e[32;1m\]\h:\[\e[31;1m\]\w]$ \[\e[0m\]"
export PATH
export TERM=linux
export PSQL_HOME=/var/lib/pgsql

alias vi='vim $*'
프롬프트 설정이 완료 되었고, postgres 마스터 계정의 패스워드를 바꿔줍니다. pg_hba.conf 에서 로컬의 접속도 md5로 변환 해줄 것이기 때문에 미리 바꿔줘야 나중에 마스터 계정으로 접속이 가능합니다.
$ vi $PGDATA/pg_hba.conf
맨 밑으로 내려보면 아래와 같은 설정이 있습니다.
# TYPE  DATABASE        USER            ADDRESS                 METHOD

# "local" is for Unix domain socket connections only
local   all             all                                     peer
# IPv4 local connections:
host    all             all             127.0.0.1/32            ident
# IPv6 local connections:
host    all             all             ::1/128                 ident
# Allow replication connections from localhost, by a user with the
# replication privilege.
#local   replication     postgres                                peer
#host    replication     postgres        127.0.0.1/32            ident
#host    replication     postgres        ::1/128                 ident
다음과 같이 바꿔 줍니다.
# TYPE  DATABASE        USER            ADDRESS                 METHOD

# "local" is for Unix domain socket connections only
#local   all             all                                     peer
local   all             all                                     md5
# IPv4 local connections:
host    all             all             127.0.0.1/32            ident
host    all             all             10.0.0.0/24            md5
# IPv6 local connections:
host    all             all             ::1/128                 ident
# Allow replication connections from localhost, by a user with the
# replication privilege.
#local   replication     postgres                                peer
#host    replication     postgres        127.0.0.1/32            ident
#host    replication     postgres        ::1/128                 ident
postgresql.conf 파일을 열어 리스너 부분의 주석을 해제하고 * 옵션을 줘서 모든 ip에 대해 접속 가능하게 리스너 설정을 합니다.
$ vi $PGDATA/postgresql.conf


# - Connection Settings -

listen_addresses = '*'                  # what IP address(es) to listen on;
저장 후 DB를 재구동 해줍니다.
$ pg_ctl restart
PostgreSQL DB 설치는 완료 되었습니다.
최신 댓글